How to Deal with Stale Fuel in Your Lawn Mower
Stale fuel can cause all sorts of problems, including preventing your lawn mower from starting and affecting its performance, and is one of the major contributors to mower breakdowns.
Old petrol in your mower can go bad in as little as 2-4 weeks, so it’s important to only put as much fuel in your mower as you need, and to drain it before putting it into storage over the winter months.
But if you’ve forgotten to properly store your mower over the off-season or you’ve gone longer between grass cuts than you anticipated, fear not! We’re here to talk you through fixing this issue step-by-step with minimal tools required.
How can you tell that it’s stale fuel that’s stopping your lawn mower from starting?
Typically there will be fuel in the tank but the engine will not fire up. If the machine has been left for a few weeks, you will probably just have to drain the fuel in the carburettor float bowl; if it has been left over winter, the fuel tank will probably need draining also.
The process here will be to drain any stale fuel from your carburettor, then if that doesn’t resolve the issue, drain any stale fuel from the tank, and if this doesn’t resolve the issue, cleaning or replacing the carburettor, especially if the stale fuel has been in it for some time.
So, let’s get started!
How to drain stale fuel from the carburettor
First, you’ll need to drain the fuel from the carburettor.

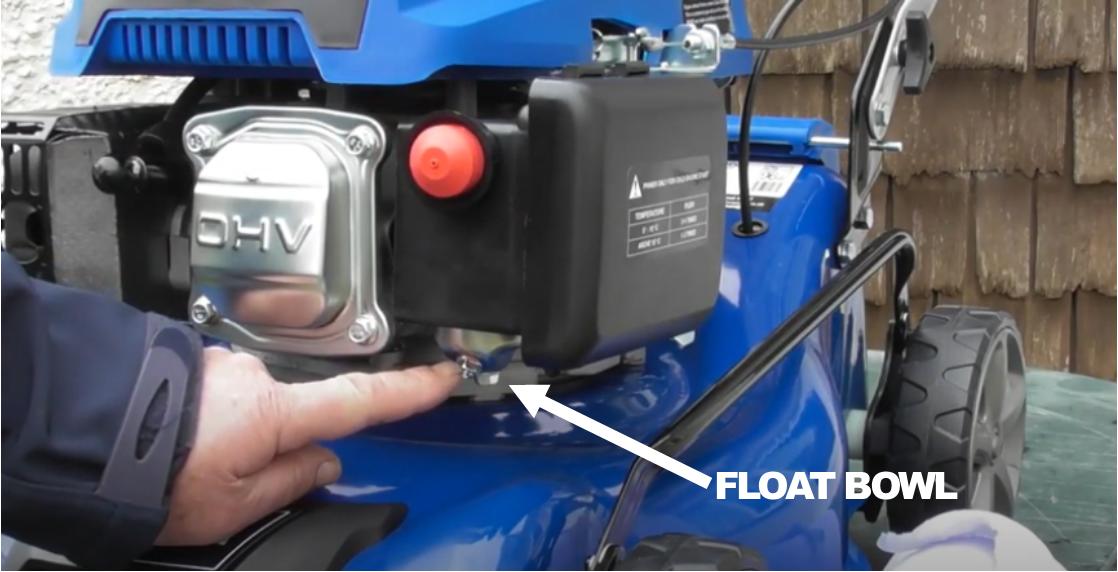
The carburettor is usually near a small black box, which houses your air filter, and the drain point for your carburettor will be a screw hole underneath the egg-cup shaped float bowl. The lowest bolt is usually what holds the bowl onto the carburettor so leave that one in position – we’re interested in the bolt slightly above and at a 45-degree angle.
Make sure you place a suitable container beneath the float bowl to collect any fuel that drains out, then undo the 10mm bolt anti-clockwise. Ensure you’re doing this in a well-ventilated area – outdoors is best – and away from any sources of ignition.
Once the fuel has stopped flowing, you can refit the drain bolt. Make sure you don’t misplace the fibre washer on the drain plug. Then, clean up any split fuel.
If your stale fuel was only in the carburettor, there’s a good possibility that your mower will be able to start at this point. If it doesn’t, keep reading.
How to drain stale petrol from the lawn mower fuel tank
You’ll need to locate the fuel tank. To do this, you can check your lawn mower manual (if you have misplaced this, you should be able to download them from our website, or hyundaisupport.co.uk. We are constantly improving our manuals, so feel free to contact us via chat, email or phone if you’d prefer to get your copy that way.)
Method 1

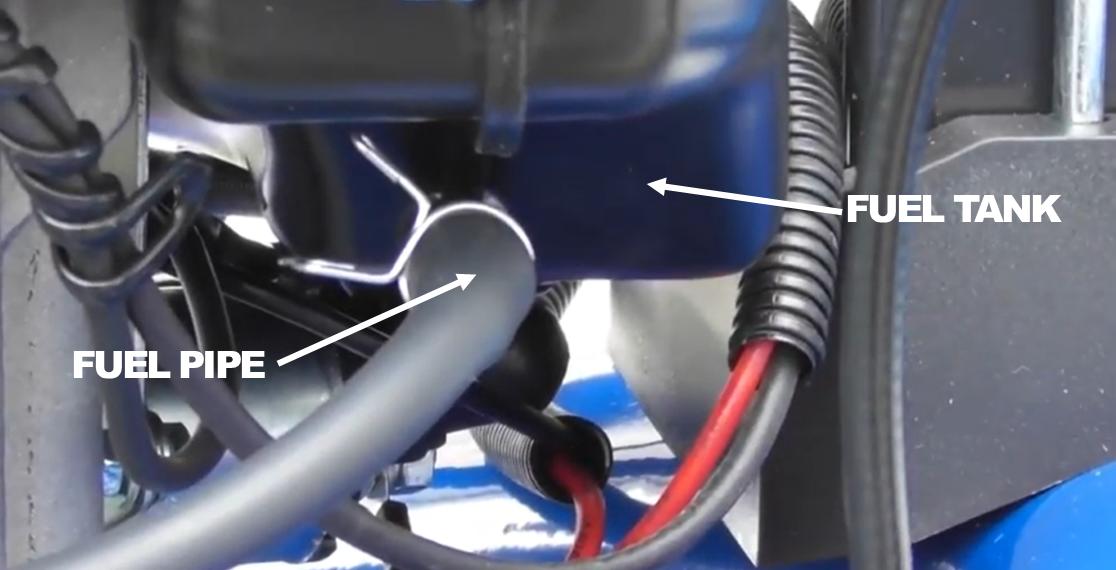
Underneath the fuel tank, there will be a rubber fuel pipe that connects to the bottom of the fuel tank with a little silver clip. Squeeze the two ears of that clip and pull it slowly back and down the pipe so it’s out of the way.
For this step, you’ll need a suitable jug with a spout that will fit over the fuel outlet at the bottom of the tank.
Once again for this step, you’ll need to put down some paper towels to catch any spilled fuel. Gentle tease the pipe away from the fuel outlet, put your thumb over the end of the pipe to stop any fuel spillage, and then quickly replace it with the spout of the jug.
Method 2

An alternative method is to draw any fuel out through the filler cap. If you have someone helping you, one person could tip the mower and the other could catch the fuel in a jug from the filler cap.
If you don’t have a second pair of hands, you could also use a hand-pump. To do this, dip one end of the pump into the fuel and the other into the jug and then pump the fuel from the tank into the jug.
Regardless of your method, make sure you dispose of any stale fuel responsibly.
After you’ve drained the fuel from your lawnmower tank, the carburettor will have filled back up with fuel so you need to repeat the previous step to drain the carburettor to ensure all stale fuel is out of the mower.
At this point, if your fuel wasn’t too stale or if it wasn’t left standing for too long, your mower may start up.
If your mower still isn’t starting, the stale fuel may have done some damage to the carburettor. In that case, the next step is removing the carburettor and assessing it for any damage, or seeing if it needs replacing entirely.
How to access the lawn mower's carburettor

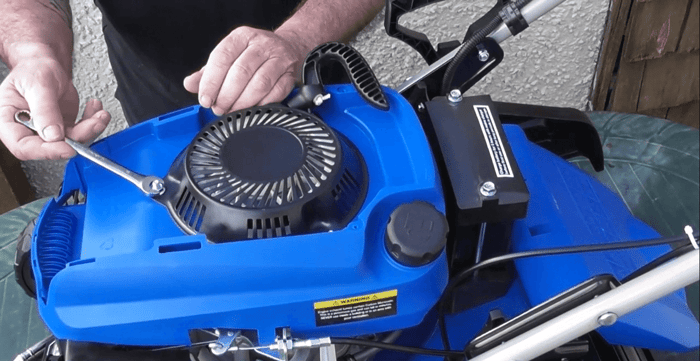
To gain access to the carburettor, push down on the two lugs on the top of the air filter box, remove the outer half with the filters on and put it to one side. Next, you’ll need to remove the rest of the air filter box.
For this step, you can use a 10mm spanner but will be easier with a socket. You will need to loosen these bolts with the spanner or socket and then remove them completely by hand.
On the rear of the air filter box, you will see a rubber pipe that connects the air filter box to the crank case of the engine. It’s usually easier to remove this pipe from the engine end rather than the air filter box end. Give it a gentle tug to remove.

Once you’ve done this, you will be able to pull the air filter box forward and to the side, but be gentle as there is another pipe connecting the primer bulb to the carburettor.
Look for a metal ring (similar to the one that connected to the fuel tank in an earlier step) and undo it, making sure not to lose it, and pull away the rubber pipe from the air filter box. You may need a pair of pliers for this step to gently pry it out. Now the air box can come away completely for full access to the carburettor.
The next step is to remove the carburettor from the engine altogether.

You must now remove the gasket - make a note of which way around (up/down and back/front) the gasket fits on – this is really important when refitting it back together.
Exactly as before, squeeze the spring clip attaching the metal ring to the fuel inlet hose coming from the carburettor and use pliers to gently remove the hose end.

The next step is to remove the linkage, identified by a fine spring with a hook on the end and a metal rod. Remove the fine spring hook gently with the pliers. Pull the carburettor towards you and turn the throttle as you go and the metal rod will just pull easily out of the top of the carburettor.
The carburettor should now just slide off. Ensure that the gasket behind the carburettor stays in place so you don’t get it confused with the gasket at the front that you’ve already removed.
How to clean and maintain your lawn mower's carburettor
Replacement carburettors are available from our parts department - click here to contact us. Refitting your new carburettor will be the exact reversal of the way we just took it off.
If you want to service your carburettor rather than replacing it, read on.

For this step, it’s vital to note the orientation of the drain bowl to ensure that the drain plug (which we emptied earlier) is sitting in line with the primer outlet. This is important because it will need to be put back together back in line with this later on and won’t be immediately obvious unless you make note of this.
The next step is to unscrew anti-clockwise the lower bolt (not drain plug) to remove the drain bowl from the carburettor. Bear in mind that there may be some residual fuel still in the carburettor so put a paper towel underneath to catch any fuel leakage. Make sure you don’t lose the rubber ‘o’ ring which lies under the top of the float bowl as you’re unscrewing the lower bolt, as well as the red fibre washer at the bottom of the screw you’re undoing.
Check for any signs of rust or debris inside the float bowl once this has been removed – if you spot any, you’ll need to replace the carburettor.

If there is no rust or debris, gently pop out the large rubber ‘o’ ring which circles the very top of the float bowl and put it safely to one side.
The next step is to remove the float. Remove the little pin which slides freely side to side and holds the float in place, and put that to one side. You can now pull out the float. For your mower to be able to start again, it’s important that the end of the float needle is clean.
Next, remove the main jet. You can use a flat bladed screwdriver to find the slot within the jet hole and unscrew it anti-clockwise, taking care not to use too much force. If your carburettor is gummed up, the parts inside – the emulsion tube and main jet – may not fall out easily once the screw is undone.

The main jet has a hole right through its centre which can get blocked or narrowed by stale fuel residues – this will need to be cleaned. The emulsion tube also has many small holes which may get blocked from the stale fuel so will also need to be cleaned. This tube will have a narrow end and thicker end. When putting the carburettor back together, the thicker end goes in last.
With compressed air, you can clean the opening and housing of the main jet and emulsion tube to remove any residues. For a thorough clean, you can spray all the openings, the main jet and emulsion tube with carburettor cleaner and then spray with compressed air to make sure it’s completely unblocked and dry before reassembly.
Once everything is clean, it’s time to put it all back together.
Follow the previous steps in reverse and check off each one as you go, being careful not to use excessive force.
Now that everything has been refitted, you can refill your lawnmower with some fresh fuel and check for any leaks from the fuel lines. You can now start it back up and get back to cutting your grass. Sorted!
If you need any further help, you can view our help video below or by clicking here.
We hope you’ve found this guide helpful and remember: if you need any further buying advice, our team of experts is on-hand to help you so just get in touch!
Click here to see our full range of lawn mowers available. For expert advice or any questions you may have, you can give us a call on 01646 687880, fill out the contact form here or drop us a message on any of our social media pages - Facebook, Instagram or Twitter.

 Expert Advice and Aftersales
 Free UK Delivery*

