Helpful Tips & Advice For Servicing Your Petrol Lawnmower
Petrol lawnmowers, like any product with a working engine, will always require a certain degree of maintenance. Just like your car or motorcycle, a petrol lawnmower has key features that you need to stay on top of to ensure its performance remains as it should year after year.
Servicing your mower doesn't have to be a daunting task. We will take you through this step-by-step guide with our helpful tips and helping you learn along the way to complete your service with ease.
We would recommend when it's time to service your lawn mower that you always refer to your user manual supplied at the point of purchase. This will be full of helpful tips and advice specific to your model and will guide you through your servicing schedule and requirements.
LAWNMOWER SEASON IS JUST AROUND THE CORNER
It might not feel like it at the moment but spring is just around the corner. In no time at all, we will all be heading to the shed or garage to dust off the lawnmower for that first cut of the season.
Now is the time to start thinking about servicing your lawn mower, it will allow you enough time to address any problems with your mower before that grass gets out of control and have your mower running smoothly.
DISCONNECT THE SPARK PLUG
The very first thing to do is remove the spark plug. On all Hyundai models this can be found at the front of the machine and the engine block.
Once you have located the spark plug, please remove the HT cap. by firmly pulling it off and then remove the spark plug by placing the long reach spark plug wrench over the plug and turning it anti-clockwise to loosen it. Be careful to keep this wrench straight, to avoid putting strain on the ceramic insulator, as this is quite fragile.
Please note we are not going to replace the spark plug just yet, we will explain this later.
REPLACING THE AIR FILTER
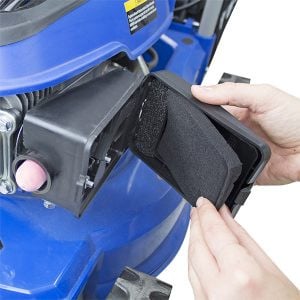
 The next step in the process is replacing the air filter. An air filter plays a key role in maintaining your petrol lawn mower. It acts to prevent any debris or dust particles getting into the engine.
Please refer to your user guide to identify the exact air filter your machine will require. You can also find this in the link to our service kits a little further on in this blog.
Replacement times of your air filter will vary depending on the type of usage your mower is getting. We would recommend regularly checking this and, as a general guide, replacing every 3 months.
Removing the air filter is a fairly straightforward process. Simply unclip the outer cover to reveal the air filter. To replace the filter you simply reverse this process. Be careful not to allow dust into the air filter.
To help find the location of your air filter always refer to your user manual.
If you are unsure which filter you require please refer to your user manual.
MOWER BLADES
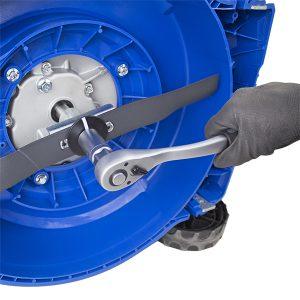
To replace your blade ready for the season we always recommend that you tilt your mower on its side so the handles are sitting on the ground, also ensuring the spark plug is facing the air.
It’s really important that the spark plug is not replaced before this point if you accidentally turn the crank there is a chance you could start the engine up and have the blade spinning, which is obviously very dangerous. Always keep your spark plug out when dealing with your blade so there’s no chance of this happening.
To remove the blade, make sure you always wear heavy duty gloves, undo the centre bolt by turning it anti-clockwise and safely pull the blade plate off. Once you’ve done this, take your new blade plate and thread the bolt back on, making sure the new blade plate is safely attached. Ensure this is tightened to the correct torque as stated in the manual.
SHARPEN THE BLADE
We would advise you to sharpen your blade at least once a year. This will depend on the age of the mower and how often the mower is being used. Blades that are not quite as sharp as they should be will eventually rip through the grass as opposed to creating a clean cut. Sharp blades will handle this quickly and help you keep on top of a healthy lawn.
Please do touch base with us directly regarding this if you are unsure and our onsite technicians will guide you through the correct method of sharpening your blade.
TIGHTEN ANY LOOSE BOLTS
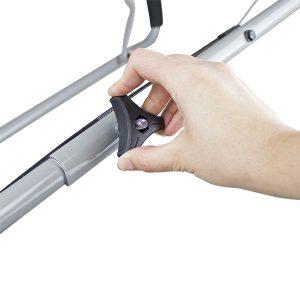
Chances are your lawnmower has probably been sitting in your garage or shed since the end of the summer. Now will be a good time to check all nuts and bolts across your lawn mower.
Overtime wheel and handle bolts can become loose, your mower also could have been moved about or knocked during the off season or during storage. As wheels and handles take the brunt of the impact, please ensure all these are checked before you head out for the first cut of the season.
YOUR PULL START CORD
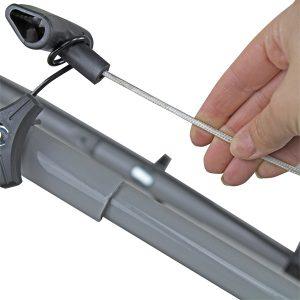
Your starter cord really does go through it and does a lot of work. The strain of starting your lawn mower multiple times can lead to the cord becoming frayed. Just check the condition of your cord and keep an eye on this throughout the season. These are easily replaceable and available on a next day service. We also have a team just the other end of the phone should you need any advice or tips with replacing your Hyundai cord specifically.
CHANGING THE OIL
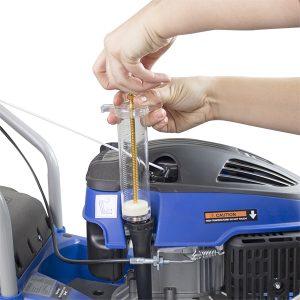
To change your oil, first locate your dipstick which can be on the top, side or back of your lawnmower.
You’ll need a syphoning syringe to suck the oil out. Remove the dipstick, stick the syringe down until it goes no further and simply by pulling it up you’ll be draining the lawnmower of oil.
Once you have removed all of the oil, you’ll have to replace it with new oil. Always make sure the new oil you put in goes up to the correct marker on the dipstick. Once you’ve done that, screw the dipstick back in to place. We would also advise you to keep an eye sporadically on your oil level throughout the season.
REPLACING THE SPARK PLUG
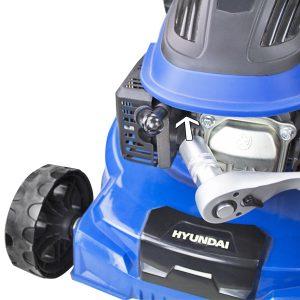
Put your new spark plug in the spark plug hole and begin to tighten it in by hand until you can feel it’s quite tight. Please ensure you’re screwing the spark plug in correctly so that it won’t cross thread. Once it’s tight, tighten it with your deep socket and replace the HT cap.
HYUNDAI SERVICE KITS
We recommend that you service your lawnmower at the start of each season and every 25 hours thereafter during the summer season.
Spending time maintaining your lawn mower not only can prolong its life but will improve the efficiency of your lawn mower.
Please click the link below. Hyundai have model specific service kits all available on a next day service to help you carry out your service like a professional.
https://hyundaipowerequipment.co.uk/garden-machine...
END OF SEASON LAWNMOWER TIPS
At the end of the season there are a number key tips we recommend you follow.
Ensure you clear the underneath of your lawnmower before putting it away for the winter season. Clearing any debris from around decking can really be key for maintaining a healthy mower. Clearing any blockages can help prevent overheating of the engine and help prevent that first start of the year becoming an arduous task.
Draining the fuel at the end of the season is also key for keeping it in good working order. Ensure you run your lawn mower almost dry or at least only leaving a small trace. For the most part, petrol has a certain shelf life - normally this is around 30 days. Anytime after this it can cause stale fuel. Although a relatively straightforward step, this really can be vital in ensuring that you are optimising the life and performance of your lawnmower.
TOP TIP: Do remember if you are disposing of any fuel at the end of the season, please contact your local authorities and explain. They will have helpful advice and will guide you on the correct method of doing this.
We hope you have found this guide helpful and that it gives you the confidence to carry out your lawnmower service. If you do have any questions or would like any further information please do not hesitate to get in touch with our team at Hyundai Power Equipment. You can contact our team on 01646 687 880 or email [email protected].

 Expert Advice and Aftersales
 Free UK Delivery*